The Ultimate Guide to Instagram Reels
Share this

Love ’em or hate ’em, there’s one thing we can all agree on when it comes to Instagram: it’s all about Reels right now.
While they’re fun to watch, the prospect of needing to make Reels consistently for your business? No one will blame you if the word “overwhelming” came to mind.
But don’t worry – I gotchu.
I truly believe that when you have a great system for producing Reels, they really can be the quickest, most fun, and dependable way to grow your business.
Not only does Instagram have over 1 billion users who are spending, on average, 53 minutes a day in the app… but the algorithm is also ACTIVELY working to find you views and customers.
That’s right, it’s the literal job of the algorithm to place video content in front of people it knows they will be interested in. That means the algorithm already knows who will be the best fit for your content, and is incentivized to show it to them.
That’s good news for you and your business!
Since the reveal of Reels in 2020, I’ve created multiple six figures using this one feature alone and helped thousands of students create short-form videos for their businesses (many of them were starting from scratch).
Our student Hilary Hughes booked out an entire event in 7 days and generated around $1,400 back to her business while balancing a full-time corporate job and being a mom.
And Lonnie, who skyrocketed his art sales from $1K to $15,482 in just a month.🤑
The truth is, ONE Reel is all it could take to attract your next customer.
Inside this Ultimate Guide to Instagram Reels, you’ll discover all you need to know to make a high-performing Reel for your business.
Along the way, I’ll share pro tips to save you time and energy, as well as step-by-step instructions for creating and editing your Reel. Feel free to bring your phone along!
I can’t wait to see what you create.
Let me show you everything you need to know in this Ultimate Guide to Instagram Reels.
Table of Contents:
- What is an Instagram Reel
- How to Use Instagram Reels for Business
- Instagram Reel Dimensions: Sizes, Ratios, and More
- How to Make Reels Like a Pro
- How to Schedule Reels
- How to Use Instagram Insights
- How the Instagram Reels Algorithm Works (so you can see better results!)
Let’s dive in!
WHAT IS AN INSTAGRAM REEL?
Instagram Reels are a feature of Instagram that allow you to create, edit, and post short-form videos up to 90 seconds long.
Reels can help you promote your business, educate your audience, and get creative with marketing.
Reels have their own tab in Instagram, though you will see them in your regular Instagram feed as well.
You can record and edit a Reel in the Instagram app, with options to set your video to music, add voice clips, text, and more. Once you publish your Reel it will be posted to the Reels section of your profile, and you can choose to share it to your regular Instagram feed as well.
Just like regular posts, any Reels you share may even end up on someone’s Explore page!
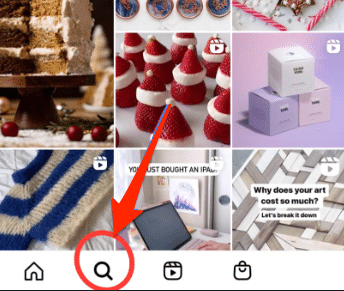
Since their reveal in 2020, Reels have been a great way to connect with potential or existing customers, share your brand values, and show your audience what goes on behind the scenes.
HOW TO USE INSTAGRAM REELS FOR BUSINESS
First, it’s important to choose the right account for your business.
CREATOR VS. BUSINESS ACCOUNT: WHICH ONE DO YOU NEED?
When choosing what type of account is best for your business, you’ll want to choose between a Business account or a Creator account.
An Instagram Business account offers quite a few features unique to helping your business grow, like:
- Advanced audience demographics (including the best times to post)
- Additional call-to-action buttons to allow your contact information or send people to your website.
- Integrations with third-party apps and tools like Later for planning ahead and posting automatically
- The ability to choose a business category and write a bio about you and your business (this copy is crucial– I teach you exactly what to write in your bio for more leads HERE)
- Monetize your feed and sell directly from Instagram with Shoppable posts
- Get in front of the RIGHT audience with customized audience targeting
Don’t yet have a business, or doesn’t quite sound like what you need?
If you want to build your personal brand on social media, then Instagram Creator profiles are perfect for you!
This is a great choice for influencers and creators who want to increase followers, create brand partnerships, and share content within a specific industry.
An Instagram Creator account will give you access to the following:
- Advanced audience demographics (including the best times to post)
- See your stats in Instagram’s “Creator Studio”
- Additional buttons to allow your contact information or send people to your website (psst… there are fewer options than business accounts)
- Access your follows and unfollows to help you know what content’s working and what’s not
- Category labels for your account bio
- Plus, you can sort your DMs into three categories: primary, general, or request
WARNING: Creator accounts cannot use scheduler apps like Later or Planoly.
👉Tip: If you’re a creator who still wants to use a scheduling app, you can change to a business account and choose “Entrepreneur” when prompted to select a category (this way, you have access to all the trending music library, as well).
HOW DO I SWITCH TO A BUSINESS ACCOUNT?
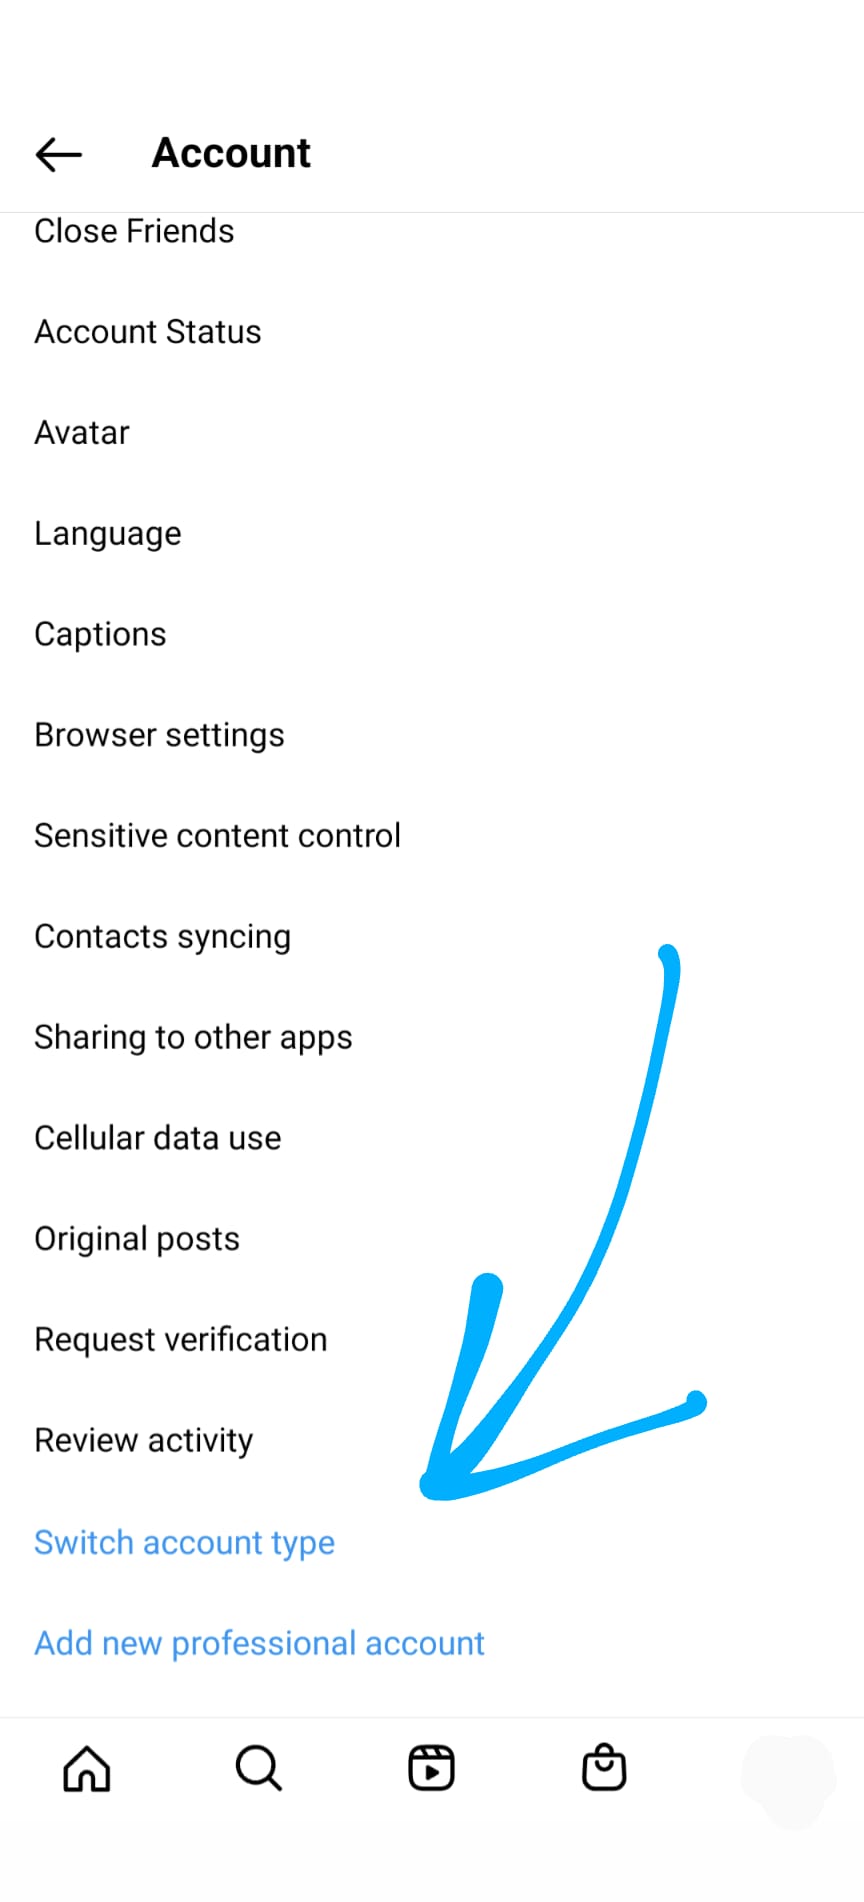
Simply go to settings in the Instagram app. Then click “Account” and scroll down until you see the option to “Switch account type.” Choose the option that’s best for you!
WHAT KINDS OF REELS TO MAKE AS A BUSINESS OWNER
You’re ready to start making Reels for your business, but maybe you’re wondering what the BEST types of videos are that will actually make a difference in your leads and sales?
You can be as creative as you want to be, but here are some fail-safe types of videos you can make to start generating buzz around your business today:
- A “talking head” Reel, where you speak to the camera to share tips or to share about your life or business. Here’s an example.
- Offer a Point of View (POV) video of the lifestyle your brand is centered around, or a customer experience, like in this example.
- Share a review or record an unboxing, like this example.
- Give a behind the scenes look of your business, such as this.
- A Reel based around a trending audio, where you simply use an audio clip that’s trending and create content around it. Here’s an example.
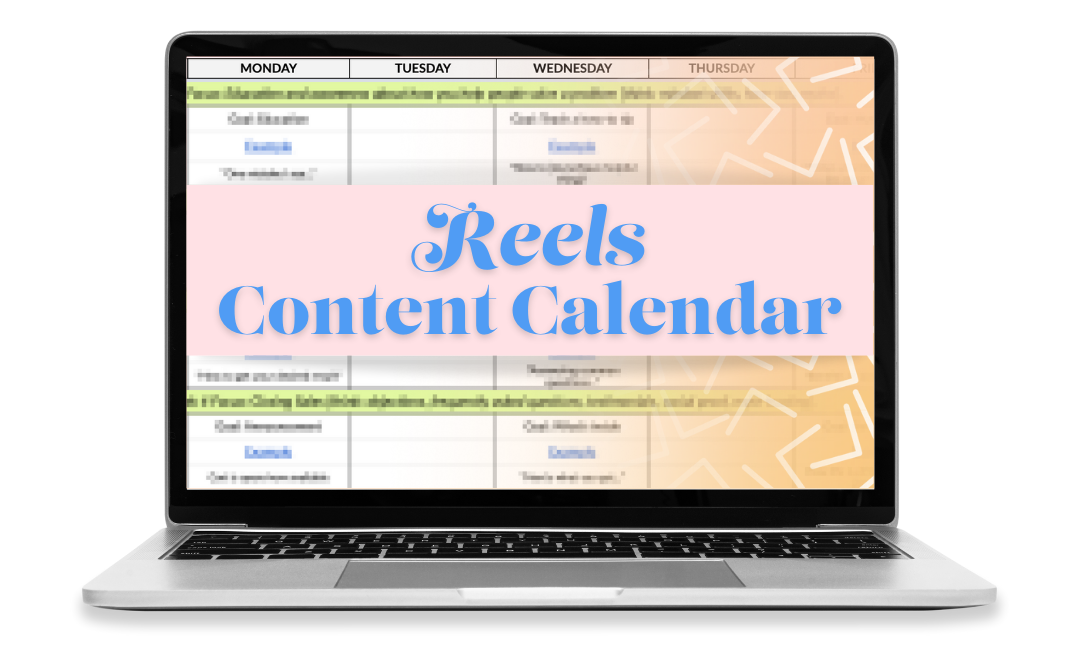
Want more? I’m just getting started. Get a full month of content ideas in my FREE Reels Content Calendar here.
HOW TO FIND TRENDING REELS
One way to get more views is to make videos using an audio that’s currently trending. And it’s super simple to find these trending audios in the app!
Inside the Instagram app, tap on the Reels icon at the bottom of the screen. When you come across a Reel with a tiny arrow at the bottom beside the name of the audio, click this arrow.
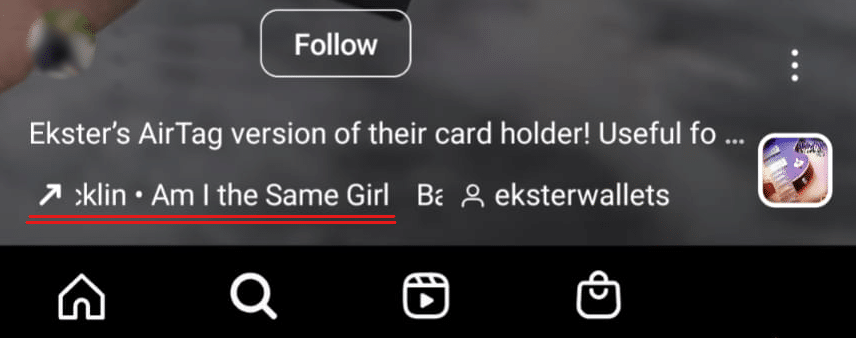
Congratulations, you’ve discovered a trending sound!
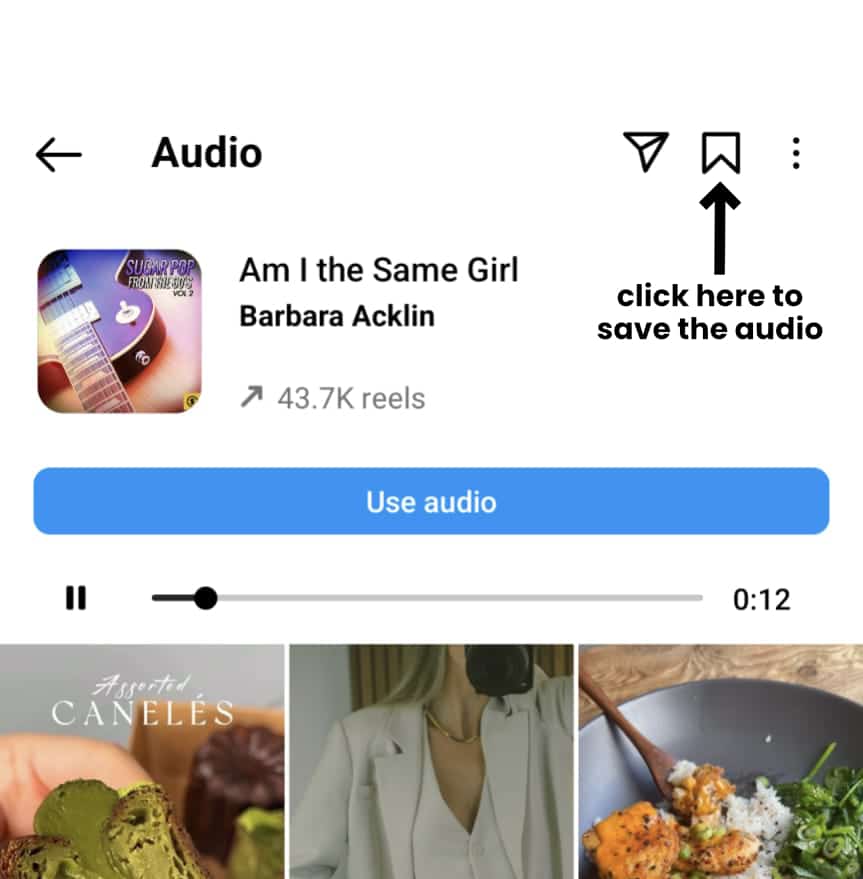
You can see where the sound originates from and how many Reels have been created using this audio, and you can scroll through for ideas of your own.
You’ll also see two buttons. One button for using the audio to create a Reel right away, or you can click the “save audio” option and create your video at a later time.
Instagram Reel Dimensions: Sizes, Ratios, and More
If you want your Reel to look its very best (and perform even better), then it’s important to keep the suggested sizing in mind.
Using the wrong sizing can lead to weird cropping of your content or pixelation of an image.
(Heads up: The algorithm favors quality images. Probably because your audience prefers them, too!)
Here’s the correct sizing to use…
The Instagram Reel cover size is the same as an Instagram story: 1080 pixels x 1920 pixels (an aspect ratio of 16:9).
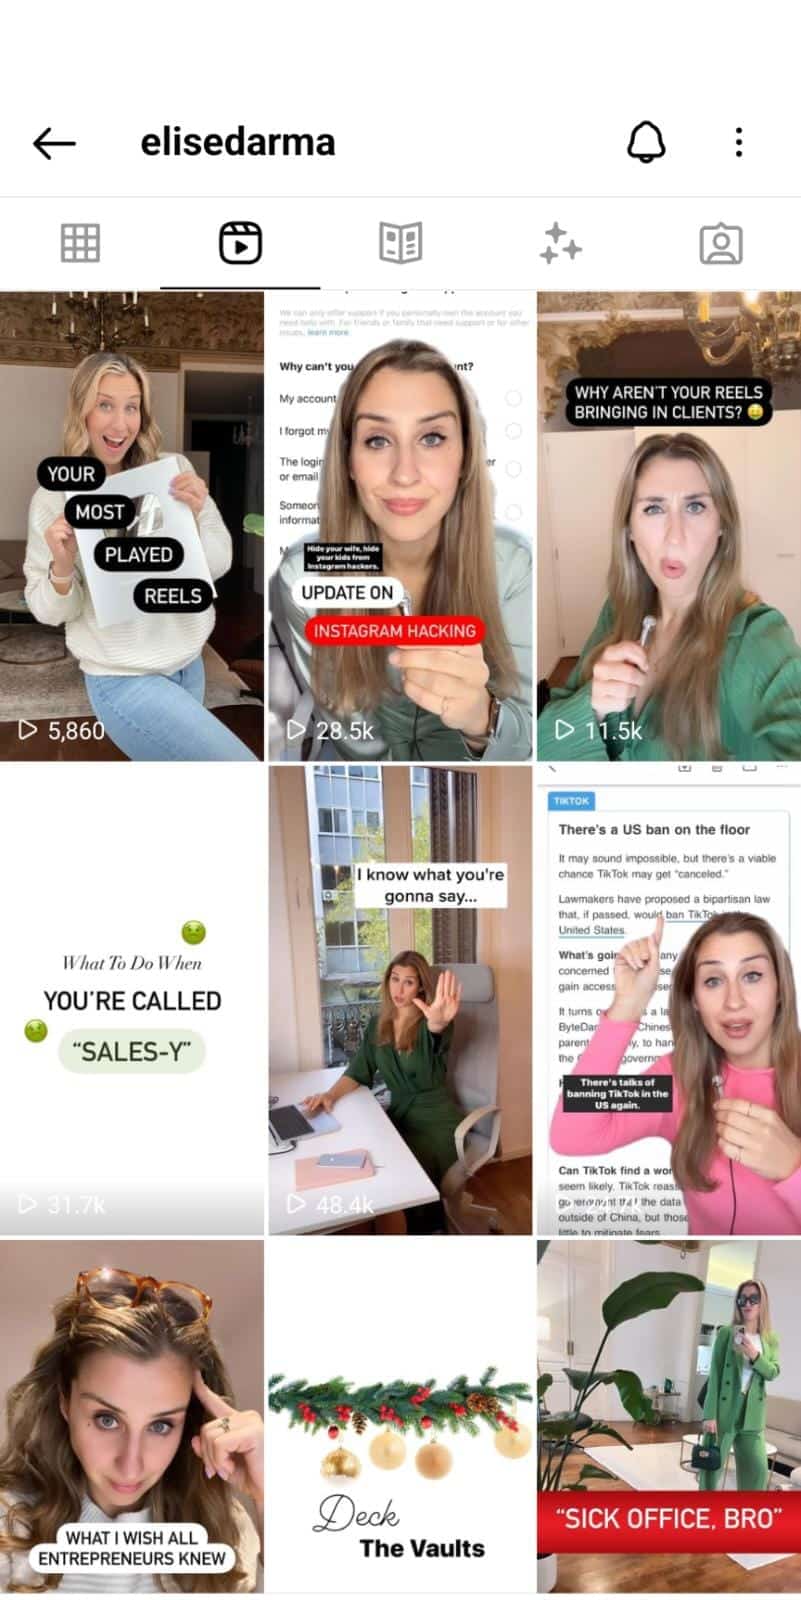
Here’s how to create an Instagram Reel cover:
- Create an Instagram Reel. Then hit “next.”
- Tap on the preview image that says “cover.”
- You can add a frame from your current video or tap “add from camera roll” to select an image from your photo album.
- Pro tip: I like to create a Reel cover before publishing so that it’s ready to go when I’m uploading
If you want to crop the image, simply tap “crop profile image” on the Share settings screen and position it to your liking.
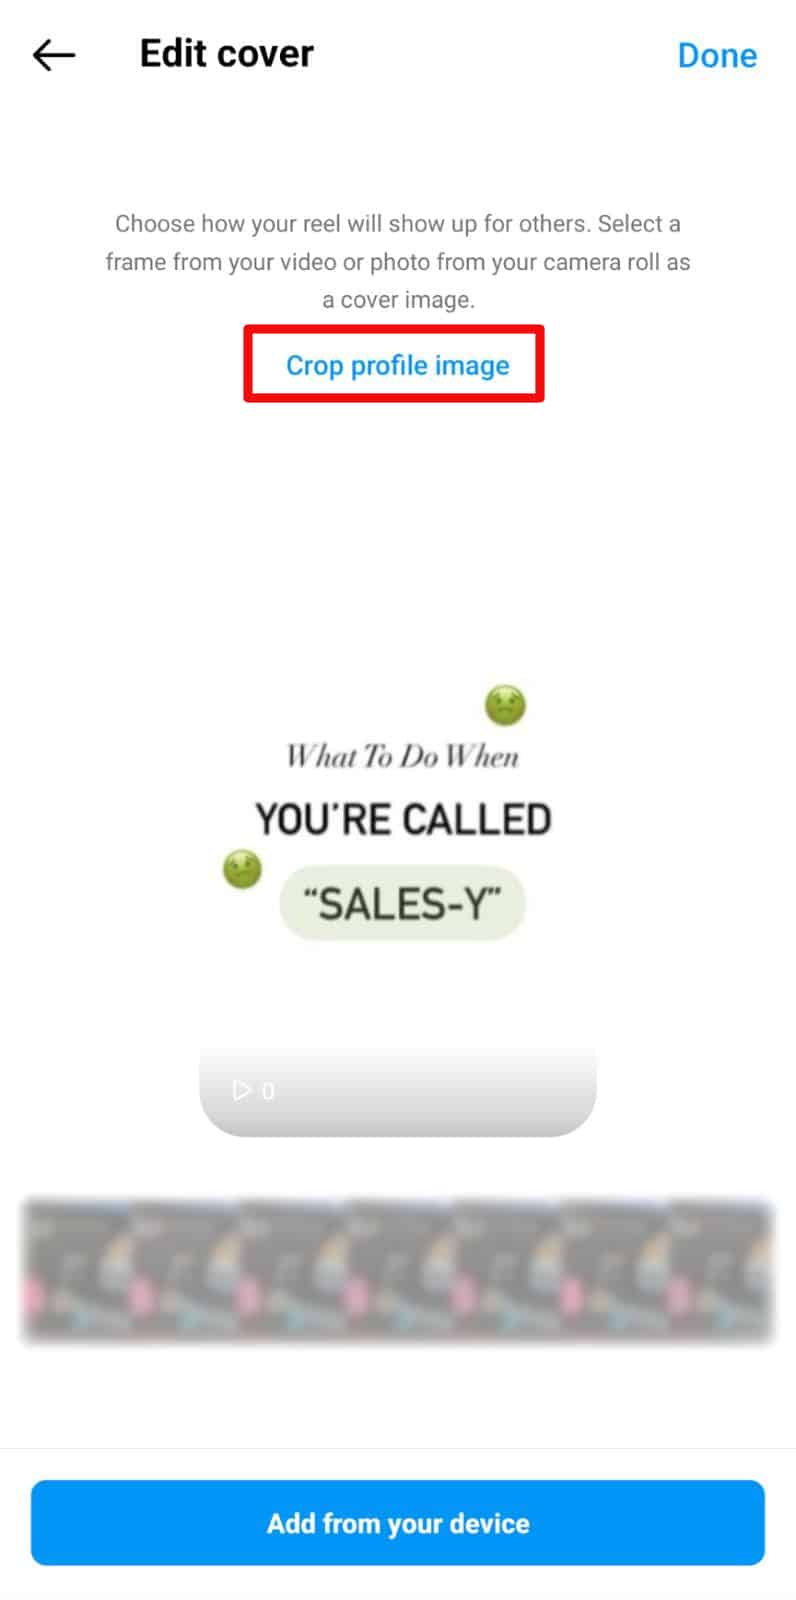
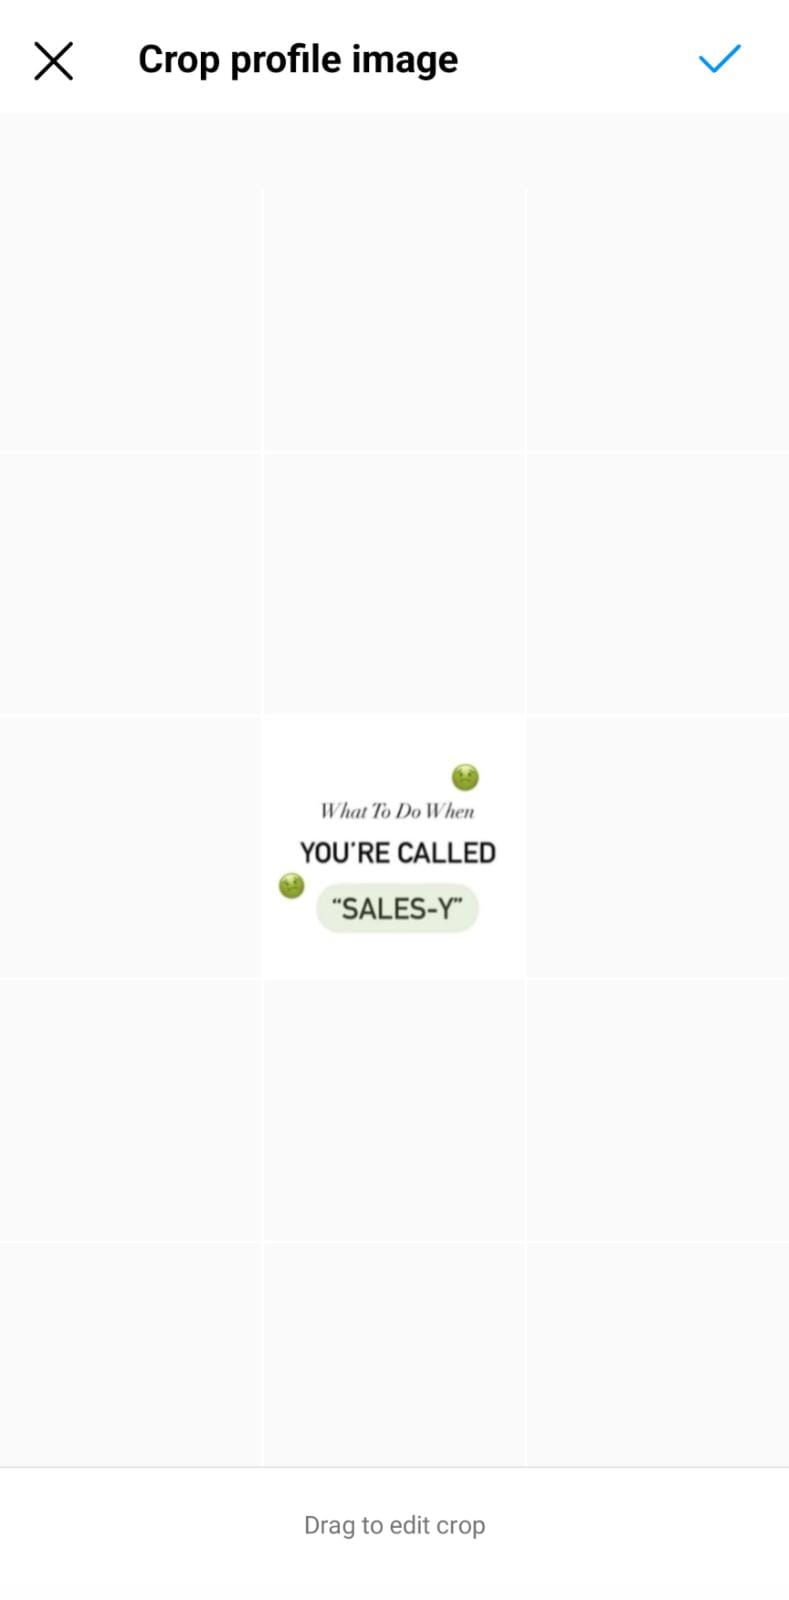
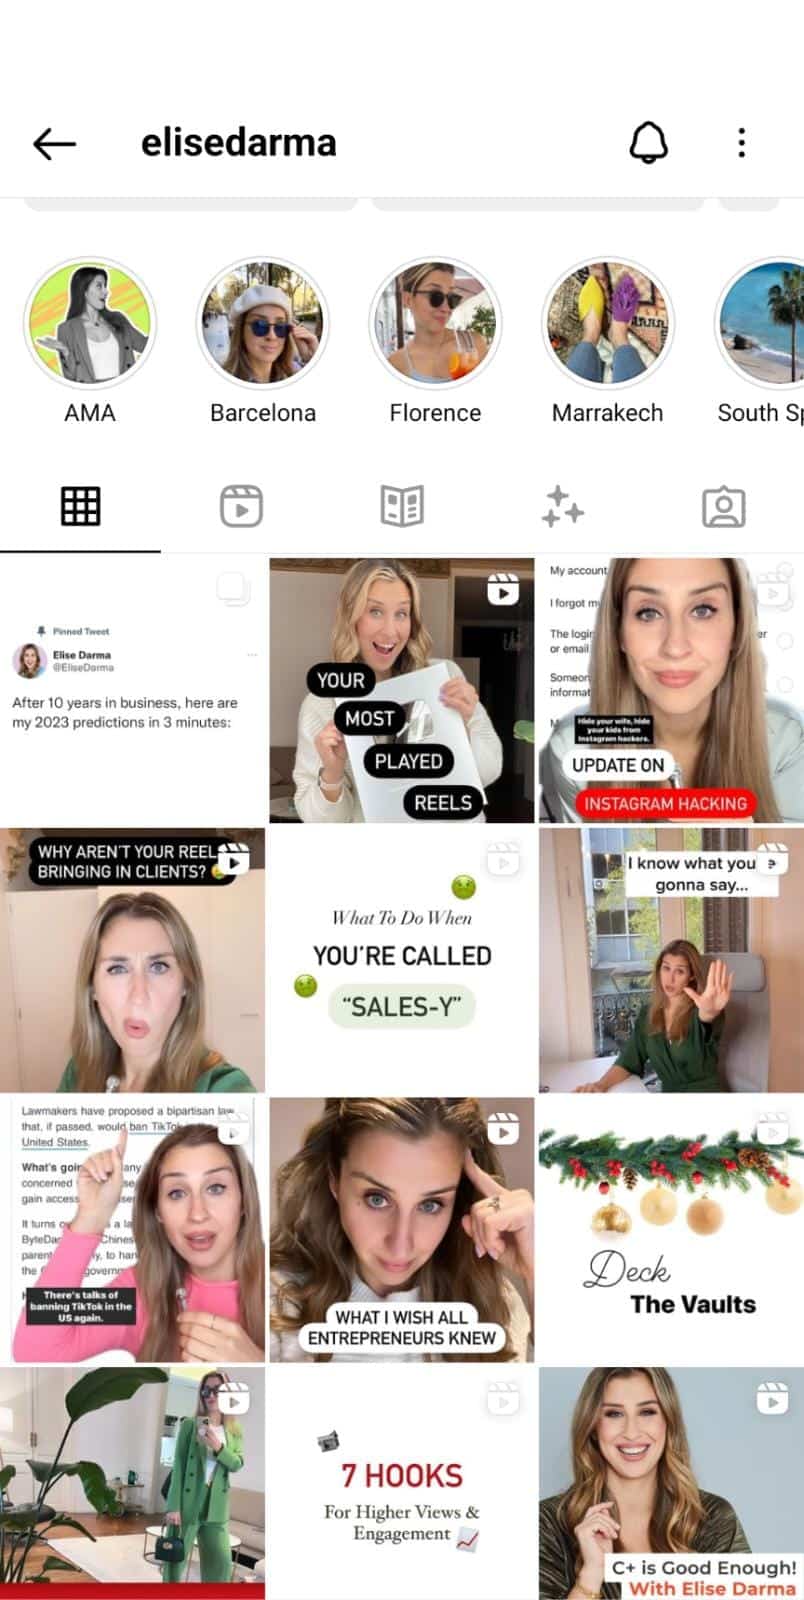
Keep in mind that when you post a Reel to your feed, the full Instagram Story-sized cover won’t be seen, and instead it will be cropped down to the regular size of posts on your profile grid, at 1080 pixels x 1080 pixels (an aspect ratio of 1:1).
So when designing your Reels cover, make sure there’s a square area suitable in the image to fit this ratio that you’ll position to show up in your feed. Like this:
HOW TO MAKE REELS LIKE A PRO
First, open the app. There are three ways to create a Reel:
- Press the plus button at the top right of the home feed.
- Swipe right as if you’re creating a story, and then find Reels at the bottom.
- Or, tap the camera in the top right of the Reels home feed.
Once you’re inside the Reels editor, you’ll see options along the side. Below is a quick breakdown of what each of them does for you.
Audio – Tap to add audio
Effects – Here, you can choose the filter you’d like to use
Add Yours – Create prompts or choose from others, a great way to engage with the community
Number with circle around it – Choose how long you’d like your Reel to be. The options are 15, 30, 60, or 90 seconds.
1x: the speed you’d like to record your film in
Video Layout: This is helpful if you want to film with a split screen
Timer: Use this to allow time for getting into place or breaking up a video
Dual: You can record with both the front and back of your phone camera.
Align: This will only appear after you record the first video:
![]()
![]()
Now it’s time to record!
HOW TO RECORD YOUR REEL:
To record, hold down the record button (the circle) at the bottom of the screen.
Or, you can record outside of the app and upload your film by pressing the (+) sign icon in the bottom left and hit “Next.”
Once filming the video is complete, you’re ready to edit.
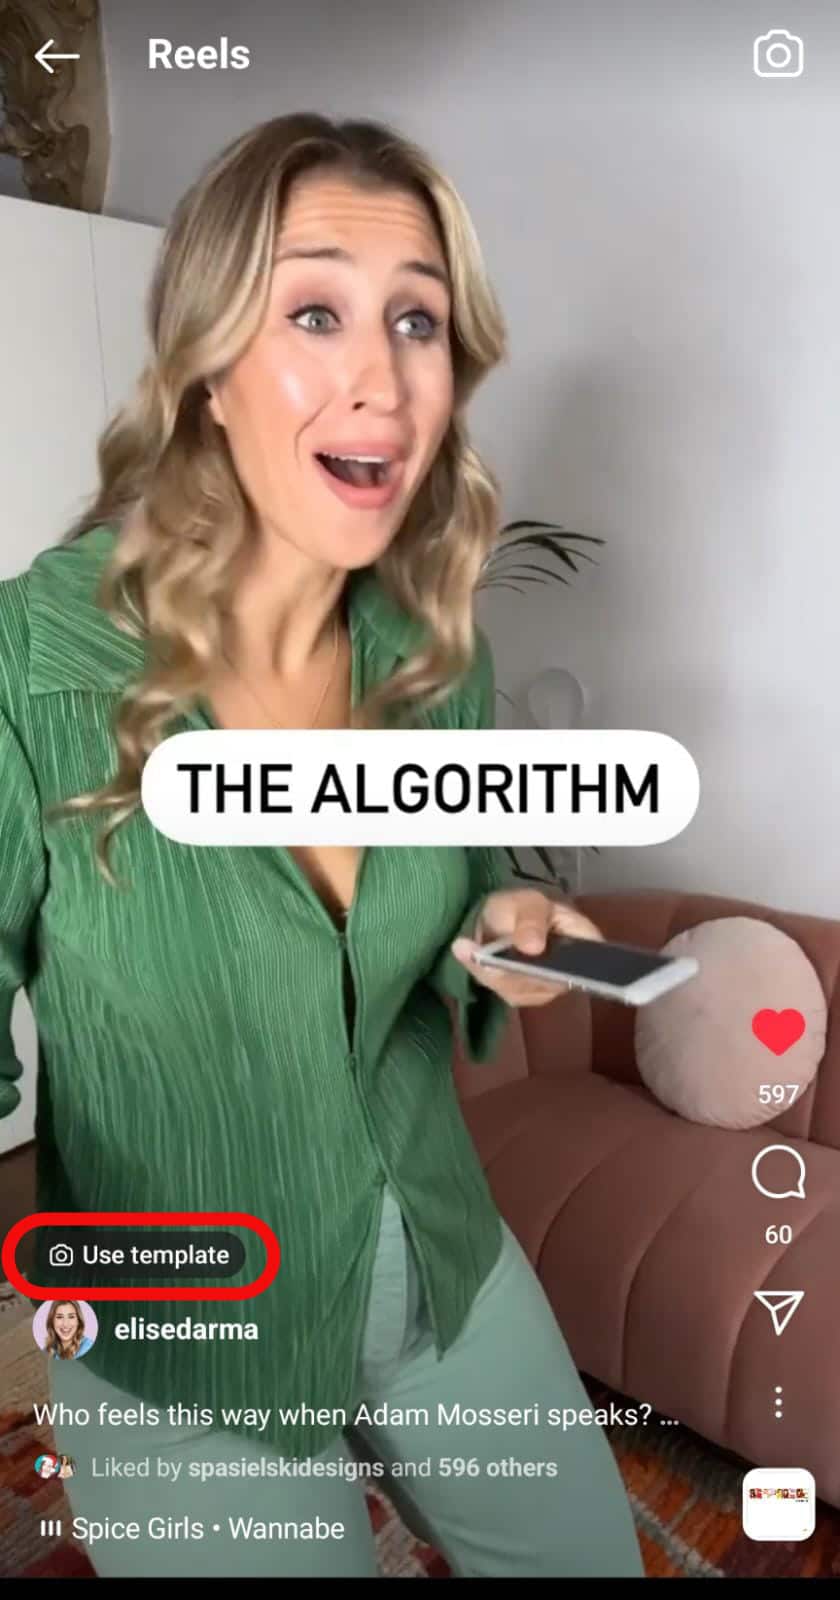
Note: Did you know you can start with a template? Simply find a Reel offering the template option (see the example below). Click the “Use template” button located just above the creator’s photo. A new window will open with the options to add pre-recorded media.
HOW TO EDIT YOUR REEL:
Inside the editor, you’ll see several options to edit your Reel. Here’s an overview of the most common editing features you can try today.
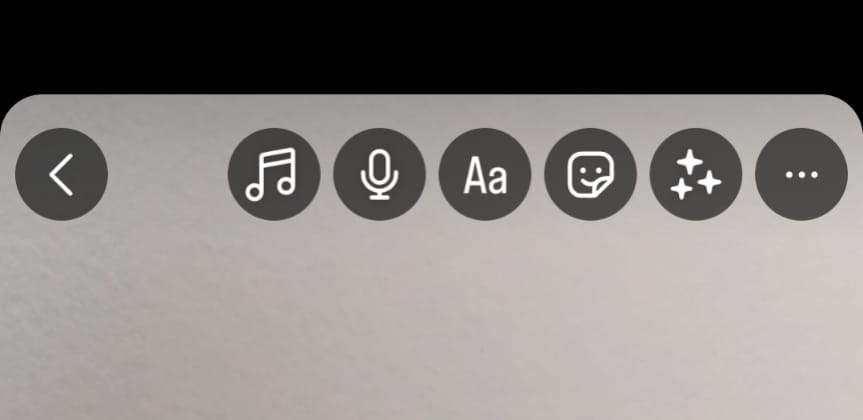
- Add Audio
Let’s start with adding audio. Tap the musical note icon to select music, add a voiceover or choose a voice effect.
- Add a Filter or a Special Effect.
Adjust the look of your Reel with a filter or a special effect, like glitter or snow.
- Add Stickers and Include Captions
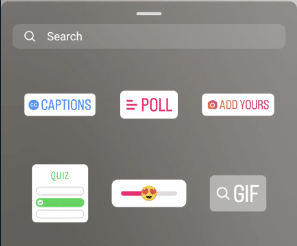
In order to add stickers, tap the happy face icon and select Gifs. When you hit the happy face icon, you’ll also see an option to add captions. Using captions is a great way to make sure your video is accessible, plus most people use Instagram on silent mode, so even those with their sound off can still watch your video, without simply swiping away.
- Draw on your Reel
Using the paint and coloring tools, add color and personality to your Reel.
- Add Text on Screen
You can add text by clicking the double “Aa” icon at the top of the screen.
Pro tip: Want the text to pop up at a certain time? Click the highlight text preview at the bottom of the screen. Drag the slider and toggle where you want the audio to be placed.
Watch a step-by-step Reels text editing tutorial here:
One final note, if you add more than one clip or photo, then you can add transitions or reorder the clips by tapping the “Edit clips” button at the bottom of your editing screen. I cover transitions in more detail on Youtube.
You’ll also see a Remix feature which is a great collaborative tool with other brands or businesses. You can add commentary to another person’s video or your own. Watch a complete breakdown of the Remix feature on my Youtube channel.
Next, you’ll want to upload a cover for the Reel or create it inside the app. Remember the cover sizing rules? Use those to crop the cover and also share the video to your feed.
And finally, it’s time for writing your captions. Generally, you’ll want your captions to be shorter because longer captions will be visually cut short.
📝 Have writer’s block? No worries. Download 12 FREE caption templates to grow your business here.
PRO TIP: Save your Reel as a draft frequently throughout the editing process. You’re working hard and don’t want to lose any of your work! Sometimes the app will randomly shut down, or your partner will distract you with snacks. Speaking from experience.
Once you’re done editing, save the video to your camera roll. You can use this video later, and you always have a backup in case there’s a glitch.
And, voilà. You are ready to publish!
WHAT TO AVOID WHEN CREATING REELS:
Ever wondered why a Reel you’ve published didn’t perform as well as you thought it would?

After growing a following of 180k on Instagram and coaching thousands of students on Reels, I’ve discovered a thing or two about what to avoid.
Here are some of the top missteps I see business owners making when it comes to Reels:
- Repost without permission – Never repost someone else’s content without permission. Check out my post here on reposting laws and best practices you need to know about.
- Leaving the TikTok logo on a video – Don’t post a TikTok video to Instagram Reels unless you have gone through the trouble of removing the TikTok logo watermark. Instagram has come out and said that they will not promote videos shared from other apps.
- Using trademarked audio – You need creative permission to use certain audio pieces as a business. If you’re using a business account, be aware that you will have limited access to music. This is why many business owners switch to a Creator account, under the subcategory “Entrepreneur.”
- Low-resolution – Quality videos are prioritized by the Instagram algorithm.
How to Schedule Reels
I’m a minimalist marketer at heart. Part of being a minimalist marketer while making a living with social media means finding apps and tools that help me work smarter (not harder).
I’m sure most people imagine content creators like me glued to our phones for the majority of the day – but I’m only on my social apps for up to an hour each day.
My secret?
When I schedule Reels in advance with Later, I can plan my content, including captions, for days, weeks, and even months ahead of time.
Every so often, I’ll schedule posts and captions in Later so I can be eating dinner, out with friends, or kickboxing while posts go Live.
There are several scheduling options within the app created for all types of businesses.
Psst… I’m an affiliate for Later because I love this app so much. Interested? Learn more about later using this link.
HOW TO USE INSTAGRAM INSIGHTS
Once you’ve made some Reels, you’ll want to dig into your analytics to see what’s performing well and what’s not doing so hot.
This way, you can create more and more of what your audience loves, and less of what they don’t.
To check your numbers, you can either click on View Insights by Boost post, or click the three dots inside Reels and then “View Insights.”

—-
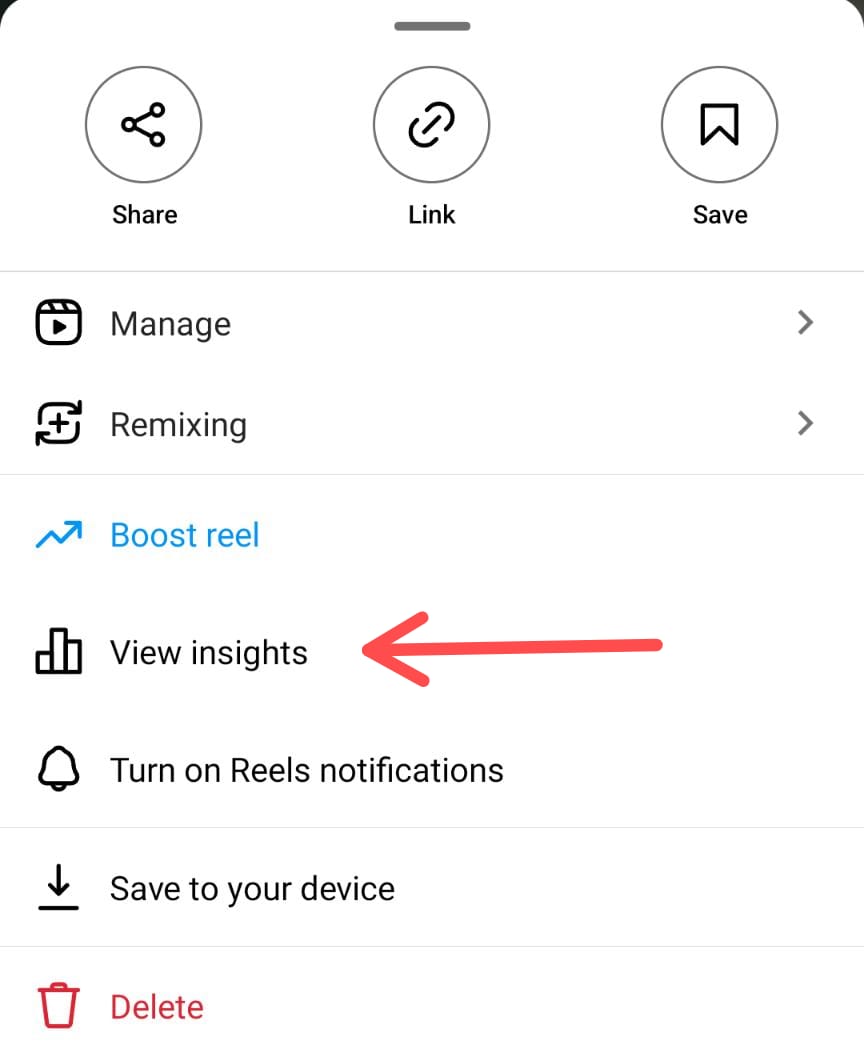
You’ll see an image similar to this one:
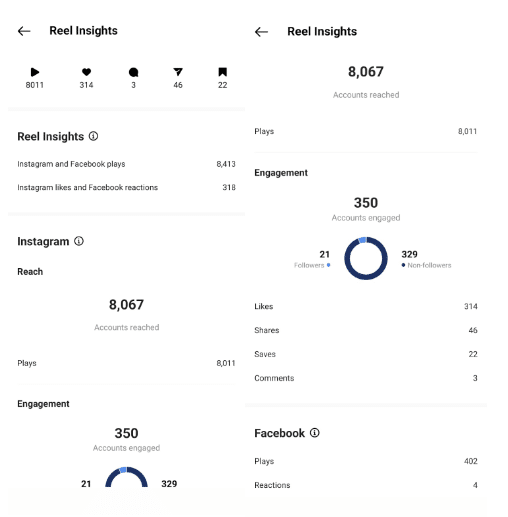
The most important things to track are the following:
Reach: The unique number of how many people who saw your Reel
Plays: the number of times the reel was played until the end
Engagement: How long they’re staying and viewing the content
Followers vs. Non-Followers: This helps you you see if the Reel is reaching your current audience or a new audience
Likes: How many people have liked your post
Comments: How many people have commented on your post
Shares: How many people have shared your post
Saves: How many people have saved your post
Overall, you want to see people engaging with your content (ahem, the algorithm loves this 💕)!
The more people comment, share, and save your post… the more the algorithm will boost the post.
It’s also insightful for you to know what your audience is engaging with the content and how they’re using it.
Specifically, shares help get your Reel in front of people who might be your followers yet, so it’s smart to occasionally ask your audience to share a post with a friend who could find it helpful.
And, when people save your content, this shows you their interest in content similar to the value you provided.
HOW THE INSTAGRAM REELS ALGORITHM WORKS
While many short-form videos are designed to entertain, as a business owner you also want to make sure that your efforts are having a real impact back to your business.
Listen, we want views AND sales (yes, please 💃).
So let’s learn how to get the Reels algorithm on our side, shall we?
Instagram wants people to be entertained and feel good. This is important. Their main goal is to keep people feeling good, so they spend more time on the app.
Important ways they measure whether someone likes a particular Reel:
- Whether they watch a Reel all the way through
- If they like, comment, save or share the Reel
- Whether they visit the audio page for the audio used in the Reel (they want to know if you’ll make your own Reel – BIG WIN!)
This means starting your Reel with a great hook so people will keep watching is really important.
You should also consider ending your Reel with a call to action. Tell people what you want them to do next, whether that’s sending your Reel to their friend, commenting with their thoughts, visiting your bio, or something else.
For a full month of algorithm-friendly Reels ideas handed to you on a platter, keep reading…
Want a full month of strategic Reel ideas sent directly to your inbox for FREE?
Save yourself HOURS of time and grab my FREE content calendar of short-form videos designed (and proven) to ACTUALLY grow your business.
No dancing required!
Create Reels that fit you and YOUR brand, grow your reach, and close sales.
Grab your FREE Reels content calendar and get a 30-day plan with a focus on the areas of education, engagement, lead generation, and closing sales.
All it takes is ONE video that could turn into 100K views, 1K new followers, and 100 new leads for your business.

Hi, I’m Elise Darma!
I traded my 9-5 office cardigan for
that 7-figure entrepreneur life. But
I’m no overnight success. I’ve
experienced burnout, overwhelm
and ghosting Instagram for the
entire month of February 2019. I’m
probably the laziest Instagram
marketer you know, but if you want
to know how to sell more by doing
less – you’re in the right place.
Get a weekly dose of what’s
working in my business that you
can implement in yours.

